Here you can learn how to upload the license file to Microsoft D365 BC or Dynamics NAV using Administration Shell or PowerShell. Follow the below simple steps.
Upload the license using Business Central Administration Shell
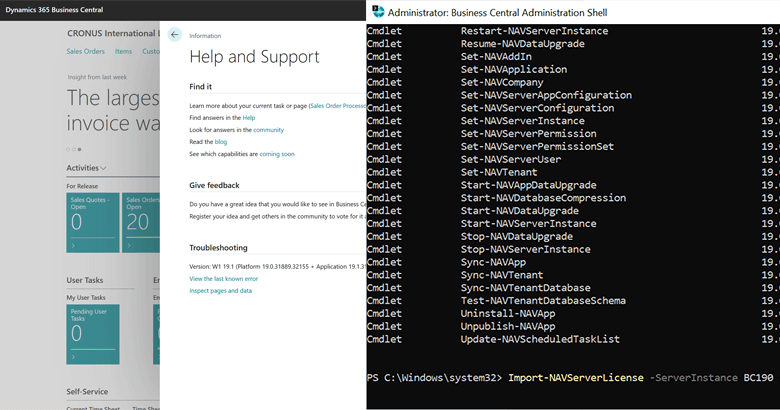
- Run Business Central Administration Shell as an Administrator.
- Execute the following command to import the license file:
Follow the below example:Import-NAVServerLicense -ServerInstance <server instance> -LicenseFile "<path to the license>"Import-NAVServerLicense -ServerInstance BC190 -LicenseFile "c:\licenses\license.flf" - Restart the server instance using following command or Business Central Administration tool:
Restart-NAVServerInstance -ServerInstance <server instance>
Upload the license using Windows PowerShell
- Run the Windows PowerShell as an Administrator.
- Import the module NavAdminTool.PS1.
This can be found in the service folder of the related version. You can execute the following command with an example to import the module:Import-Module "C:\Program Files\Microsoft Dynamics 365 Business Central\190\Service\NavAdminTool.ps1" - Execute the following command to import the license as done in the previous method:
Import-NAVServerLicense -ServerInstance <server instance> -LicenseFile "<path to the license>" - Restart the server instance using following command or Business Central Administration tool:
Restart-NAVServerInstance -ServerInstance <server instance>
Solution for error NotSpecified: (0:Int32) [Import-NAVServerLicense], FaultException`1
When uploading the license to the latest versions of Business Central you have to mention the Database parameter else the error: “CategoryInfo : NotSpecified: (0:Int32) [Import-NAVServerLicense], FaultException`1” can be thrown. Follow the below example of adding the Database parameter.
Import-NAVServerLicense -ServerInstance BC190 -LicenseFile "c:\licenses\license.flf" -Database NavDatabaseCode language: JavaScript (javascript)Here are the options for the Database parameter from the Microsoft documentation:
- Default:
Default; overrides the license file currently in use. - Master:
Forces the license file to be global. - NavDatabase:
Forces the license file to be local and stored in the Microsoft Dynamics NAV database that is used by the specified Microsoft Dynamics NAV Server instance. - Tenant:
Forces the license file to be local and stored in the Microsoft Dynamics NAV database that is used by the tenant that is specified in the Tenant parameter.
To check the uploaded license file, visit the previous guide about how to view license information in Dynamics D365 Business Central.
Vidura Dananjaya
Senior Solutions Architect - Microsoft Dynamics Navision / Microsoft Dynamics 365 Business Central and freelance developer. (The admin of NAVUSER)